
Priya Nair, Staff Writer.
You did everything the video told you to do. Two coats, a good top coat, ten minutes of drying time before you touched anything. By Wednesday there’s a chip at the edge of your thumbnail, and by Friday your polish looks like it survived a hike. If you’ve ever stood at the bathroom sink wondering why the same bottle lasts ten days on your friend’s hands and four on yours, the answer usually has nothing to do with the polish brand. It has to do with what’s happening underneath it. The nail plate is a porous, layered structure that absorbs and releases water constantly, and every time it swells and contracts, whatever is painted on top has to move with it or crack. Understanding that one fact changes almost everything about how you prep, apply, and maintain a manicure.
- Prep matters more than product: a dehydrated, oil-free nail bed is the single biggest factor in wear time, ahead of any specific formula.
- Thin coats beat thick ones: three thin layers cure harder and resist chipping far better than two thick ones, even though thick feels more “protected.”
- The free edge is where manicures actually die: sealing the tip of the nail with every coat prevents most of the early chipping people blame on the polish itself.
Why A Manicure Actually Fails
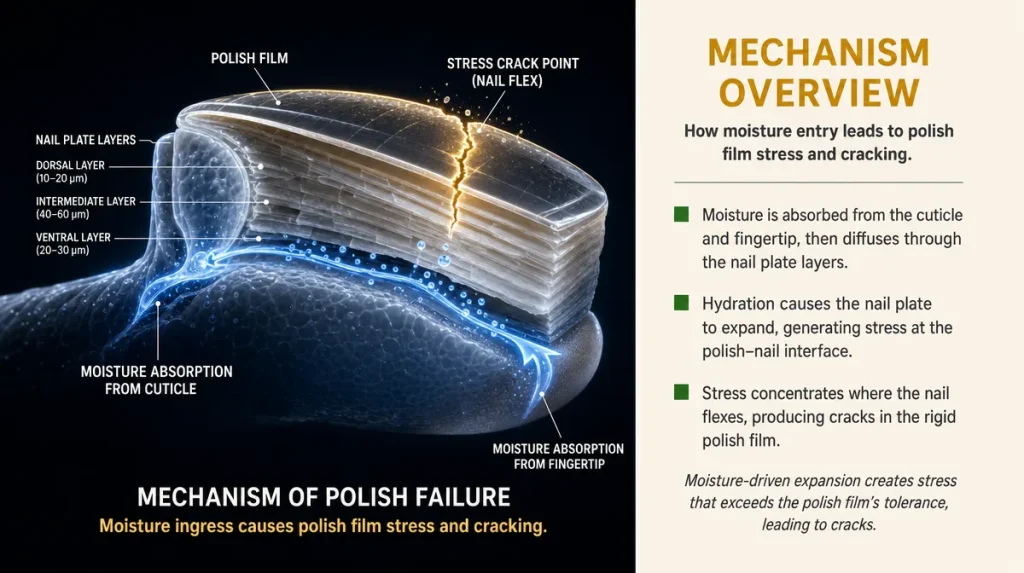
Most people assume a chip means bad polish. More often it means a nail plate that was still moving when the polish tried to hold still.
Think of the nail like a wooden floor in an old house. Wood expands with humidity and contracts in dry heat, and if you paint over it without accounting for that movement, the paint eventually cracks along the seams. Nails do the same thing on a smaller scale. The keratin layers absorb moisture from washing dishes, showering, and simple humidity, then release it again in dry air or under indoor heating. A 2021 study in the Journal of Cosmetic Science measured water content swings in the nail plate of up to 25 percent across a single day in variable humidity, and noted that polish adhesion dropped measurably when the nail was tested wet immediately before application.
That swelling and shrinking happens whether or not you paint your nails. The difference is that polish is rigid once it cures, and a rigid film sitting on a surface that keeps moving is exactly the setup for a crack. This is also why the same manicure can hold beautifully in a dry office all week and fail within two days during a humid Mid-Atlantic August. The chemistry of the polish barely changed. The nail underneath did.
Starting From A Clean, Dry Nail
Before any color goes on, the nail needs to be free of oil, lotion, and leftover moisture, not just visibly clean. Hand cream, cuticle oil, and even the natural oil your skin produces can leave an invisible film that keeps polish from bonding to the plate.
Wash your hands with soap, not just water, then wipe each nail with a bit of rubbing alcohol or a dedicated nail prep pad. Do this right before you paint, not twenty minutes earlier while you finish something else, because oil redeposits fast from your own skin.
Gently buff the surface with a fine buffer, not to roughen the nail aggressively, but to knock down the natural shine so the base coat has something to grip. The American Academy of Dermatology’s general guidance on nail care notes that over-buffing or overly aggressive filing can thin and weaken the nail plate over time, so this step should feel like a light polish, not sanding.
A quick self-test: after you’ve prepped, press a clean fingertip to the nail. If it feels even slightly slick, you’re not done. Wipe again. Polish applied to a slick surface behaves like tape on a greasy window. It might look fine for an hour and then start lifting from the edges the next day.
The Base Coat’s Real Job
A base coat isn’t a formality. It does two specific things: it gives the color coat something reliably even to grip, and it protects the nail from pigment staining, especially with reds and darker shades.
Most base coat failures come from rushing it. A base coat needs roughly sixty seconds of surface tack-down before the next layer goes on, not because it needs to fully cure, but because color applied to a still-wet base can pull and streak, thinning the base coat unevenly in the process.
One detail people skip: run the base coat brush along the very tip of the nail, capping the free edge, not just the top surface. That thin white line at the end of your nail takes the most physical contact all day, typing, opening cans, unlocking doors, and it’s usually the first place a manicure starts to lift. Sealing it from the very first coat matters more than most people realize.
Applying Polish So It Behaves
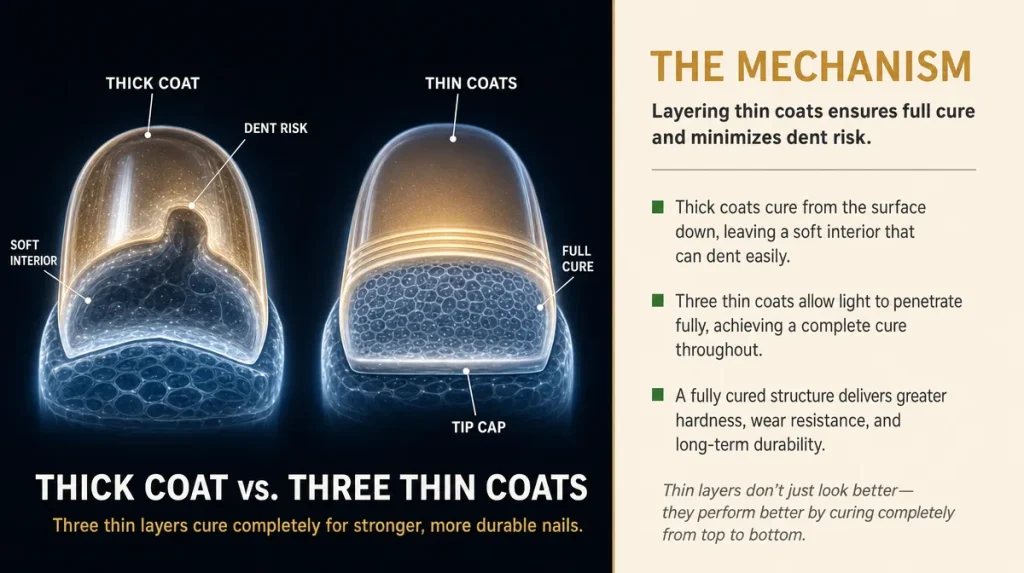
The instinct with a favorite color is to load the brush and cover the nail in two thick strokes. That’s the opposite of what makes polish last.
Thin coats cure harder because solvent evaporates evenly through a shallow layer. A thick coat skins over on top while staying soft underneath for hours, which is why a manicure can look dry to the touch and still dent from a light bump the next morning.
The method that actually works: wipe most of the polish off the brush against the bottle neck before the first stroke. Paint a thin center stripe, then two side strokes, capping the tip each time. Let each coat sit for two full minutes before the next one, not just until it looks dry. Three thin coats, evenly spaced, will outlast two thick ones almost every time.
A quick way to check if you’re going too thick: if you can see brush marks or ridges once the color is fully dry, you’re applying too much per coat.
Sealing The Edge, Every Time
The free edge, that exposed tip of the nail past the fingertip, takes more friction in a day than the rest of the nail combined. It’s also the part people forget to seal with top coat.
Every layer, base, color, and top, should be swept over the tip of the nail, not stopped at the surface. This creates a continuous seal rather than a series of stacked layers with an exposed edge where they meet, and that exposed edge is where air, water, and physical knocks get underneath the polish first.
Top coat itself should be reapplied every two to three days, even over a manicure that still looks fine. A thin fresh layer restores shine and reseals any microscopic gaps that have opened from normal wear, and it takes under two minutes. This single habit, more than any specific top coat formula, is what separates a manicure that makes it to day ten from one that starts flaking by day four.
The Habits That Undo A Good Manicure
Hot water is the quiet enemy of long wear. Long dishwashing sessions, hot showers, and hot tubs all push moisture into the nail plate faster than normal handwashing does, and that swelling is exactly the movement that cracks polish from underneath. Wearing gloves for dishes and cleaning isn’t just about your hands, it protects the manicure too.
Cuticle oil is genuinely good for nail health, but applying it heavily right after a manicure can undercut adhesion at the edges before the polish has fully hardened over the following twenty-four hours. Save the heavier oil applications for a day or two after painting, then use it freely.
Opening cans, peeling stickers, and using your nails as tools puts direct lifting force on the free edge specifically, the same spot that’s already doing the most work. If you notice one nail chips first every single time, it’s worth asking what you actually do with that finger during the day rather than blaming the bottle.
Reading Past The “10-Day Wear” Claim
Wear-time claims on packaging are tested under specific lab conditions, and Good Housekeeping Institute’s lab testing methodology for beauty claims, described in the magazine’s own published testing summaries, generally involves controlled application and standardized wear panels, not everyday dishwashing, gardening, or gym sessions. That’s not deceptive, it’s just a different environment than your actual week.
Gel-effect formulas, “chip resistant” formulas, and standard lacquers can all perform well or poorly depending far more on prep and application than on the marketing language on the box. A formula marketed as long-wear applied over an oily, unbuffed nail with thick coats will still chip fast.
The genuinely useful claims to look for are about flexibility and film hardness balance, since a polish that’s too hard cracks under nail flex and one that’s too soft dents easily. Beyond that, most of what determines your actual wear time is in your hands, literally.
Adjusting For The Season
Humid East Coast summers and dry, heated winters ask different things of the same routine. In humid months, nails hold more water and swell more throughout the day, so lean toward slightly thinner coats and more frequent top coat refreshes, roughly every two days rather than three.
In dry winter air, indoor heating pulls moisture out of nails and surrounding skin, which can make nails brittle and more prone to a specific kind of edge chipping that looks like small flakes breaking off rather than a full crack. Regular cuticle oil between manicures, applied to the skin around the nail rather than directly under a fresh coat, helps offset that dryness.
Fall and back-to-school season often brings a wave of drugstore polish hauls and new seasonal shades, which is a fine time to experiment, but the fundamentals don’t change with the color. Whatever shade you’re reaching for at the drugstore or picking up during a Target run, the prep and application steps underneath it are what decide whether it makes it past Wednesday.
Key Takeaways
A long-lasting manicure is built before the color ever goes on. Clean, dehydrated, oil-free nails give any polish a real chance to bond. Thin coats cure harder than thick ones, and sealing the free edge with every layer, from base coat to top coat, protects the part of the nail that takes the most daily abuse. Reapplying top coat every two to three days does more for wear time than switching formulas ever will, and adjusting your routine slightly for humidity or dry winter air keeps results consistent across the year.
A Quick Routine Checklist
- Wash hands and wipe nails with rubbing alcohol right before painting, not earlier
- Lightly buff the surface, without over-filing
- Apply base coat and cap the free edge of each nail
- Use three thin color coats instead of two thick ones, letting each dry fully
- Cap the tip with every layer, including top coat
- Refresh top coat every two to three days
- Save heavy cuticle oil application for a day or two after painting
- Wear gloves for dishwashing and hot water tasks
- Adjust coat thickness and top coat frequency with the season
This article is for general informational purposes and is not a substitute for professional advice.
Individual results with any nail care routine may vary.